31
Mar
2011

www.jbhphoto.com
 “He tried to impress upon me that, though a camera is nothing but a tool, it can be (therefore it must be) used for a higher purpose than the meaningless transference of already visible information onto a sheet of paper. Because camera could describe a worker’s vision of his world, like a cello or a paintbrush, or granite block, camera held the capacity for art.”.
If you want to become a photographic artist the first goal is to become an accomplished master of the equipment. But, how do you get there from here? It starts with ambition and drive. Like any skill, you will only learn, and become a master, if you are dedicated. The mechanics of photography are not difficult to learn. It does take time and determination to get there, but it is not an unachievable task. You just have to have the desire and drive to work through the process of learning how best to use the tools.
 So. . . everyone has their preferred brands, methods, techniques and such. I have mine for sure. As Fred Picker said, “if you have been around for twenty years or more and haven’t formed any opinions, what have you been doing?” I miss Fred!
There seems to be a lot of paper developer formulas floating around. My wife and I have tried our share of so-called ‘magic’ formulas. We have been down the Amidol road, and don’t get me wrong, Amidol is a great developer but it is far from magic. Amidol is about the best I have found for Azo. Yes we do print on Azo, in fact, we have a stock of it on hand. I would just like to go on the record as not being a person that subscribes to the idea there are magic bullet formulas. There is what works for you and that can be anything that suits your way of seeing. Anyone that has a one-size-fits-all attitude, usually has something to sell.
We have had our frustrations with Amidol developers. And I am not convinced that it is the best, certainly not the only, developer suitable for Azo or any other paper. In a side-by-side test my wife and I determined that Amidol was our developer of choice several years ago. There is a subtle edge there that is not something you can put into words, but there is a difference we decided worth exploring. But Amidol is expensive and can be frustrating to use at times. Yes, we have tried all of the popular formulas. I have just not been too impressed with the results I have obtained at times. What I was searching for was a cold-tone developer. Not only for Azo, but for the other printing papers we use. At times Amidol was still giving a green cast on Azo. Not bad but annoying and required lengthy toning in selenium to offset. I like a cold, neutral tone for most of what I print and the Amidol formulas just wasn’t consistent enough for me. I was not happy with how things were working. It was time to do some research.
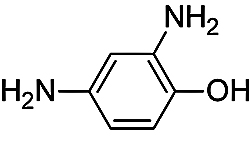
I found a lot of interest on the Internet about a Pyro base paper developer formulated by Donald Miller. Mr. Miller named his developer Pyro Plus Paper Developer (PPPD) and after reading about this formulation I was inspired to give it a try. Believe me it takes some inspiration to get me to try something new, but I was frustrated with Amidol and I needed some good news for a change.
From all of the discussions about PPPD I found one thing was clear; there were numerous variations to the formula. The original published formula called for both Pyrogallol and Pyrocatechol. Now this is where things get a little confusing. I don’t recall where I found the particular variation that I tried, but there was a suggestion from somewhere to replace the Pyrogallol with Citric Acid. Not sure where I found that, but that was the formulation that I first tried.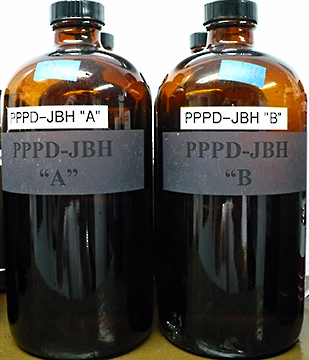
From what I gathered, adding the Pyrogallol and changing the amount of Potassium Bromide makes a more warm-tone developer. I was not interested in warmer, I wanted a cold, neutral developer. To my surprise the variation I tried worked very well. It more than met my requirements, and so far, has yielded very neutral cold tone results on the Azo we have on hand. No more green tint, just what I wanted! It has also proven to be excellent with all other papers we use. And, for those that are economy minded, Pyrocatechol is much cheaper than Amidol.
PPPD keeps very well in an open tray once mixed, but should be dumped at the end of a printing session. I have never had it to die in the tray from oxidation. It does die from exhaustion, just like most any other developer. I would estimate that after about twenty 8×10 prints per liter, you should start looking to mix some fresh developer.
This particular formula also keeps well as a premixed two-part stock solution. Part ‘A’ is mixed 1:1 with part ‘B’ for use. I found that by mixing one liter of both part ‘A’ and part ‘B’ and storing it in full brown glass bottles it keeps at least six months. At least at this point in my experiments that is as long as I have stored the stock solutions. I keep three to four one liter bottles mixed and on the shelf in the darkroom. When we go to print, you just dump a bottle of part ‘A’ and part ‘B’ into a tray and away you go.
I really like this developer and my wife is using it also. So if I am asked what developer I am using, I say now days it is my variation of Donald Miller’s PPPD. My bottles are marked PPPD-JBH for my personal favorite formula.
Oh. . . almost forgot. . . I guess if you have read this far you are interested in the version of PPPD we are using. Here is the formula that we have found to work very well with every paper we use, including Azo. Maybe it will work for you. . . maybe not. The only way to find out is to, as Fred Picker would say, “TRY IT!”
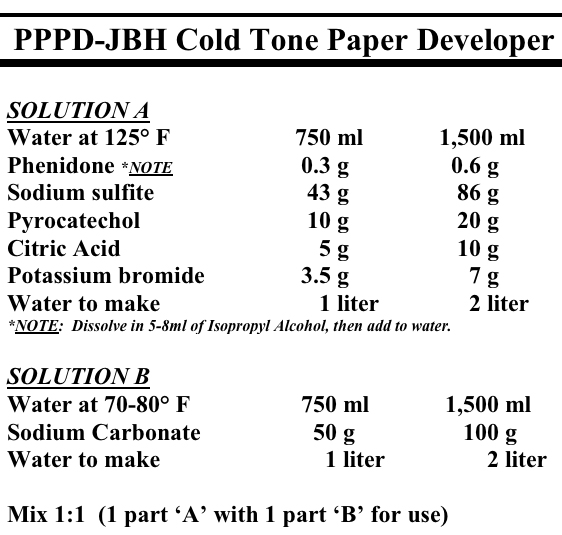
Please note that this developer contains chemicals that could be hazardous. Practice safe handling procedures when mixing chemicals. Wear gloves or use tongs when working with PPPD. In fact, it is a good idea to wear gloves when using any print or film developer.
Keep in mind this is a cold-tone developer. If you search the Internet you will find more information on other variations of the PPPD formula. Supposedly adding Pyrogallol and varying the amount of Potassium Bromide makes this a warm-tone developer, but I have not tried it, since I was not interested in warmer print tone.
I would like to personally thank Donald Miller, and all the others involved for laying the groundwork and publishing this formula, and its numerous variations, for Pyro Plus Paper Developer. Anyone wishing to experiment with PPPD, or seeking more information, try an Internet search for Pyro Plus Paper Developer.
http://unblinkingeye.com/Articles/PyroPlus/pyroplus.html
 I have struggled for years to understand the concept of what is visually stimulating. Just exactly what does it take to strike a nerve that leads to the successful completion of an expressive photograph? Specifically, why is it that I cannot easily find something in my immediate environment that I find worthy of photographing? There was a time when I really thought there was something wrong with my perception of my surroundings. Edward Weston said something to the effect that, you should be able to look down at your feet and find something interesting to photograph. Doesn’t always work for me.
The trouble is, I have a difficult time finding anything within my local surroundings that excites me very much. Some of this has to do with the fact that I live on a flat coastal plane at 600 feet above sea level and what I like the most is mountains and snow. I just can’t seem to find barb wire fences to the horizon, hay rolls, or wind mills that interesting.
I used to think this was only a personal mental issue that I alone suffered from, and that I was in some way creatively impaired. I thought that all I needed to do was find some magic somewhere that would allow me to visually connect to what I see every day. There were those times that I was able to find visual stimulation. Such as dense fog, or really interesting clouds, or maybe a rare snow storm. But most of the time I found that I was forcing myself to just get out and that what I created was not something I really cared for. So, why bother?
As I began to associate with other photographers, many living in other areas of the country, what I found was surprising. I met and talked with people that live in some of what I feel are the most visually stimulating places on the earth. To my dismay some of them have no interest whatsoever in even visiting, let alone photographing what I would give near anything to have unlimited access to. I have talked to people that have grown up within a few hours drive of these places and have never visited, let alone ever had even considered to take a look, let alone make a serious photograph of what lay literally in their back yard.
I began to realize that I was not alone when it came to finding inspiration and visual excitement within my immediate environment. I began to think more in terms that this is a normal ‘thing’. . . a ‘syndrome’. . . a ‘phobia’. . . or whatever, that many other suffer from, or in some way deal with, also.
1 “The Thing Itself; The fundamental principle of photography” First published in Newsletter, Daytona Beach Community College, 1988
http://www.billjayonphotography.com


If you are like me, you really hate having to spot prints. You especially do not like spotting negatives. I struggled for years trying to come up with a good way to spot prints. The problem is getting a good look at what you are working on, with enough detail to accurately guide that hair-fine spotting brush to just the right spot. I used a loop. . . tried magnifying glasses. . . used a magnifying viewer for some time, but nothing gave me a really good view of what I was working with.

Somewhere along the way someone suggested using a stereo microscope. What a stroke of genius!
After doing some research it became clear that a high-quality inspection microscope, with magnification in the 8x to 10x range was prefect for spotting both prints and negatives. A good stereo microscope with zoom was exactly what is needed. The ideal setup would have a long boom stand so you can swing the head out over the work area, and for spotting prints you need an illuminator. I was able to find an entire microscope package including a zoom stereo head, eyepieces, long boom stand with heavy base, and illuminator on eBay.
The microscope head that I have has a zoom range of 0.70 to 3.00 x. Using a set of eyepieces that are 10x, I have a zoom range of 7.0 to 30.0 x. This is perfect! Most of the time 7x is fine, but if I have a really tiny pinhole I can zoom in even more. The microscope illuminator is necessary for working with prints, while you will need a light box for working on negatives. This is why you need a good, adjustable, boom with a heavy base.
It takes a little getting used to, but a stereo microscope is the Rolls Royce of spotting magnifiers. Well worth the expense. This type of microscope setup is used in manufacturing quality control to inspect small parts and comes up in the used market frequently. Searching out a good microscope will save you a lot of headaches and make that unpleasant chore of spotting a little more tolerable.
JB

 We have returned to warm Texas after another month long adventure photographing in Utah. This year we spent our time equally between Springdale and Moab.
 We had varying weather ranging from warm and wet to cold and snow. It was mild in Zion and we experienced a flood. They had a year’s worth of rain in eight days. The park was closed for two days and some areas were evacuated. Water everywhere.
We left Springdale early to get ahead of a winter storm that dumped ten inches of snow in Arches NP and eighteen inches in Canyonlands NP after we arrived. Temperatures changed from mild to a low one morning of -9F and warmed most days to a balmy 15F.
 We had a great time. We lost a lot of shooting days to weather, but still made the most of it. Saw truly amazing things and hopefully brought back a few keepers. Now we are working on getting our film notes in order so we can start processing film and we are also working on our snapshot album. Hope to have some snapshots up on the web site soon, so watch here for more information.
Hope everyone had a great Christmas and New Year.
JB & Susan
 I really like hearing the story of the origin of anything. For all of my life I have heard the term ‘masterpiece’ and always thought it was a modern term as in definition #1, #2, and #3 below.
 We recently had an interesting conversation with a local gallery curator and found that we unanimously agreed on one thing. Most art and all photography should be displayed in the most simple manner possible. Nothing is more distracting, and annoying, than an obnoxious presentation. Large, gaudy, frames with funky colored mats are just plain ugly. Our approach is to keep the presentation simple. The framing and mat should be completely transparent. It should only exist to isolate and protect the photograph. If you notice the frame and mat before you see the image, it is just not right. The KISS Principle (Keep It Simple Stupid) is the only way to display photographic art.
For us, you will not find any of our prints mounted and matted with anything other than pure white, acid free mat board. If we frame for exhibition, we use narrow black aluminum frames. The only other frame we would consider would be narrow natural finish maple. Our first choice for glazing would be glass, with acrylic as the second choice. That is it. Anything else is just plain gaudy and unnecessary.