
 Every time I head into the darkroom I learn something new. I learn another way of thinking, working, creating or just being a photographer. Everyone knows that the first thrill in photography is just being there. You are out in some visually exciting environment, suffering from optical overload. You know that the vast majority of the film you expose will never be printed, but still you shoot away. I cannot count the number of times that the one I really had hopes for really flops when printed, and the one that was just a wild guess is a keeper. That is why you shoot. . . even if you are not really confident the results will be worthy of the film. You just never know, but if you do not make the exposure, you are guaranteed to have nothing.
Once you have all of the film processed and proofed, then begins the arduous task of selecting what you want to print. This is always a tedious and mostly unforgiving chore. Making a finished print is time consuming. I would say that either of us will put in ten to twelve hours in a typical printing session. And, generally we will produce, on a good day, four finished prints. Some days maybe less. That is why it is very important that the negative chosen needs to be well thought out, and you need to have some amount of confidence and a plan before you begin.
I don’t want to go into the darkroom and start haphazardly printing. I want to have some organization and a good idea of what I am going to be doing before I begin. Nothing is more frustrating than floundering around without a good starting point. It is bad for the head, it wastes time and materials. I would rather not print a day, spend that time getting prepared and then print the next day. I find that creativity is fleeting and if I am not in the mood, don’t even go there. Find something else to do till your mindset is correct. 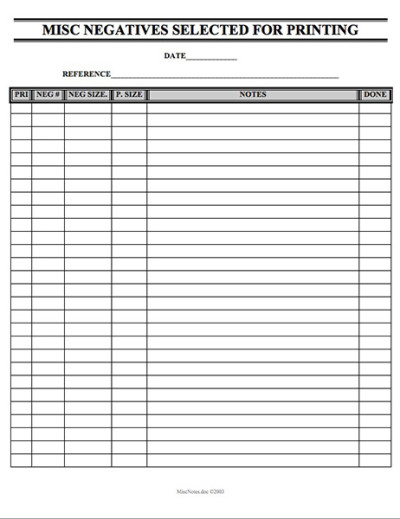
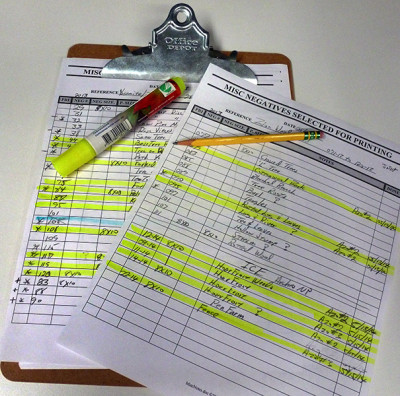
The process of negative selection begins by studying the proofs. We have worked up a sheet that we fill in with interesting photographs we would like to print. We call this sheet “MISC NEGATIVES SELECTED FOR PRINTING” and it is little more than a group of boxes to fill in with negative numbers, film size and notes. I ginned this up using a word processor years ago and we run off multiple copies and keep them on a clipboard in the darkroom.
As I said before, I keep refining my creative process. I have learned one thing that is even interesting to me. I have found that I print much better, have much greater success that is, if I concentrate on one particular type of photograph in a printing session. For me, at least, if I am printing say wood and leaves and having a good day, it is not a good idea to switch to printing running water or snow. It just doesn’t work well for me.
So, I have begun grouping my selected negatives into those that are of like content. An example would be; on our last trip we were in Yosemite NP, Zion NP and Arches NP. I did a lot of wood details in both Yosemite and Zion, so I have grouped all of the similar subject negatives onto one sheet. This way, I will only print those negatives in one, or several consecutive printing sessions. I have quite a few snow and ice negatives from Yosemite and Arches. Those will be grouped and printed in another session.
This may sound strange, but for me at least, I find that I print better when I get into one sequence of thought and keep the subject matter similar. It just works better for me. . . maybe it would work for you also?
Finding something worth exposing a sheet of film to is one thing. . . the next step is selecting the very best of your film for the finished print. Anything you can do to help will be a great asset to your art.
JB