Everyone that has dabbled with their own film and print processing has been forced to build some sort of minimal darkroom. It is amazing to hear all of the darkroom stories from those that have been there and done that. But the truth is, there are many serious photographers, that have created amazing bodies of work with only the most basic darkrooms.
My first darkroom was in a small closet in a small apartment. I bought a garment rack and my clothes hung behind the bedroom door. A working darkroom does not have to look good. . . it just has to work good. You can load film, expose, and process paper in most any area that can be made lightproof. Once loaded into the tank, film can be processed on the bathroom vanity or kitchen counter. Paper, once processed, can be washed wherever you can set up a washer.
When you start out you may move. No telling how many times you may move before you finally settle in one place. An elaborate and expensive darkroom is nice, but if you relocate, you leave most of it behind. If you rent you have to be creative. I have moved numerous times and the more you move, the better you get at setting up some area as a darkroom.
You don’t need running water, it is nice, but not necessary. You can wash prints in the spare bathroom shower, or tub. One time I had a dry sink made from an old door, with sides screwed to it and painted with enamel paint. I later modified this with a drain, but it ran into a five gallon bucket. This was set up in a spare bedroom, with black plastic over the window. I washed prints in a print washer on the floor of the shower.
You can improvise as required when it comes to the setup. Buy a really good enlarger, with a good lens. The rest is up to you and your budget. A few trays, storage bottles, daylight film tank and chemicals and you are ready to get started. The fact is, you do not need an expensive, nor elaborate, darkroom to make seriously significant prints. Learn to make the most of what is available and put your money and effort into making fine prints. Don’t let the lack of a fully equipped darkroom come between you and your creativity. You can build that dream darkroom later.

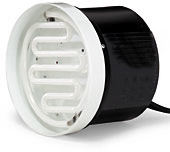 Ever wonder exactly how a Cold Light enlarger head works? How can light be Cold? The grid lamp-type enlarger light source definitely generates much less heat when compared to an incandescent light source. The heat of an incandescent lamp is generated by the infrared radiation produced by the heated filament in the lamp. A typical incandescent lamp produces more IR than visible light. In the simplest terms, the Cold Light does not generate that much IR, hence less heat. But what exactly is a Cold Light?