INTERMITTENCY EFFECT
by
J.B. HARLIN
This is one of those terms you may not be familiar with. The question that comes to mind would be, what does this have to do with photography? It has a lot to do with photography. . . especially when printing.
I first heard of intermittency from Fred Picker. He mentions it in his printing video. His comment about it is something to the effect that he knows nothing about it, but he acknowledges that it does exist. So exactly what is intermittency effect? Here is an experiment that you can perform in your darkroom to prove its existence.
Take a sheet of paper and place it in your easel under the enlarger. Set your timer for three seconds and make a test strip. Process the paper, dry and examine the progression from white to black. If you don’t have a progression of tones from near paper white to some darker tones, adjust your aperture to get a nice progression of tones across the paper. Now select one strip that represents a light shade of gray. . . say something around a Zone VI to VII. Note the exposure. . . as an example, let’s say the exposure was 9 seconds (3 bursts of 3 seconds each).
Now place another sheet of paper into the easel. . . don’t change anything with the enlarger. Set the timer for 9 seconds and expose the entire sheet. Process and dry. You may be surprised to see that the full sheet is darker in tone than the test strip. Take a paper punch and punch a hole in one of the sheets of paper so you can lay one over the other for direct comparison.
So, what happened? When printing a negative you make a test strip to find a suitable exposure for the delicate highlights. Once you find what you feel is an acceptable exposure, you set the timer for that time and expose your first full sheet work print. But you have just proven that this doesn’t exactly reproduce the delicate tones of the highlights you have chosen in the test strip. Why? This is intermittency effect! But, again. . . Why?
The first thing that comes to mind is again Fred Picker. He would say, “different is not the same.” This is intermittency effect at work. . . but Fred would say he doesn’t know about those things, they just happen and you should adjust accordingly.
This discovery by Fred Picker led to his Three Second Burst method of printing. If you have never seen this printing technique, you should watch the Zone VI Video “Printing with Fred Picker.” If you can’t find a copy of the video, I have an explanation in my book “Fine Art B&W Printing” available on this web site.
For some folks it is enough to just know something happens. For others, just saying so doesn’t make an impression and the idea is soon forgotten. Kind of like your parents telling you to do something, just because I say so. . . not always convincing. Maybe an explanation will make more of a lasting impression.
We have proven that 3 bursts of light, each 3 seconds long, does not produce the same tone as one burst of light 9 seconds long. We know this is called intermittency effect. But what exactly is intermittency effect? The quick and simple answer would be, it is a technical thing. So let’s get technical.
Printing is accomplished with a light source. Light comes from some sort of electrical device. The most common is a light bulb. Here I must digress. . . there is no such thing as a light bulb. An old friend spent many years in the commercial lighting industry and he assures me there is no such thing as a bulb. . . it is a LAMP!!!. . . So when you go to the store to purchase a new LAMP for your lamp, you are purchasing an incandescent lamp. Confusing. . . but true!!!
Back to the subject at hand. . . all enlargers have some source of light. . . tungsten lamps, or cold cathode lighting (cold light). . . they all share one characteristic that is the direct cause of the elusive intermittency effect.
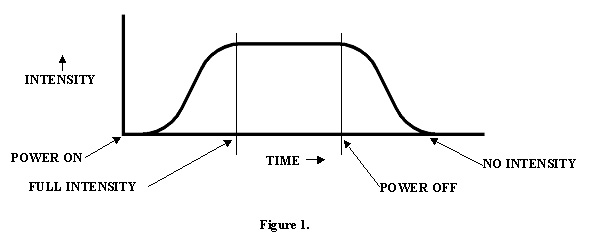
All light sources have some amount of time that is required for them to come on and go back to off. On and off being the state of producing light and then not producing light. For example, an incandescent lamp is the easiest to illustrate with. Install a large wattage lamp into a fixture and turn on the light. If you watch closely, you will notice that the light does not come up to full brightness the instant the power is applied. Now turn off the lamp. Again, if you watch closely, you will see that the light fades rapidly once power is removed.
When power is applies to the incandescent lamp, current flows through the filament rapidly heating it until it glows. When the power is removed the filament rapidly cools to a point where it is no longer generating visible light. All light sources display this characteristic. Some may appear to come on and go off instantly, but the reality is they change states too quickly for the eye to see.
If you were to measure the light intensity versus time you could plot the turn-on and turn-off times of any light source. Such a plot would look something like Figure 1.
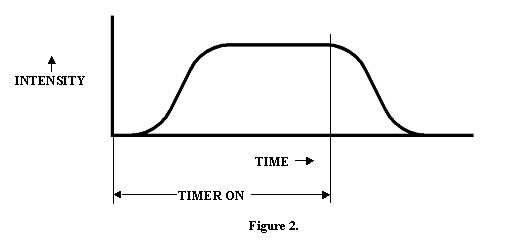
 Modifying this example plot, if you use the signal to turn-on and turn-off that is generated by the timer, the plot would look like Figure 2.

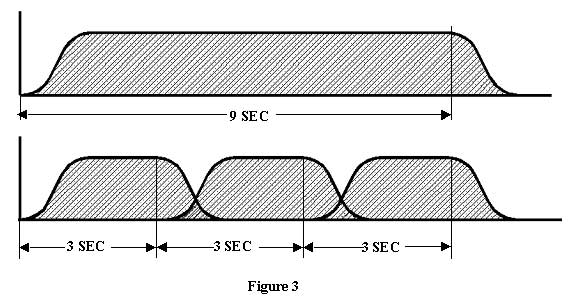
Taking this characteristic curve of the lamp output and varying the timer ‘on’ time for varying intervals, it becomes apparent that the total light output is different when the lamp is switched on and off. Looking at Figure 3 you can easily see the difference in total light output between switching the lamp on and off. . . or leaving it on continually for the same total period of time.

The shaded area represents the time period that the lamp is outputting light. This shaded area represents the time in which exposure is occurring. Remember that exposure is equal to the intensity of the light plus the time the light is on. If you were to calculate the total area in the plot during the uninterrupted exposure, compared to the pulsed exposure, you would find the total area would be larger in the plot where the lamp is on the entire time. More light (Exposure) is generated with the lamp on continually. This is the intermittency effect at work. You will not get the same amount of exposure, even though the total time is the same.
Intermittency effect is not totally caused by the light source. Light sensitive materials also respond differently to interrupted exposure. Numerous factors come into play, but due to the fact that the light source has to come up to full brightness then ramp back down each cycle helps create the intermittency effect. The effect of less actual exposure, coupled with the way light sensitive materials respond to interrupted exposure, add together to cause different densities. . . exposing for 9 seconds will not give you the same densities as 3 bursts of 3 seconds each. . . remember, “different is not the same.” Now you know about intermittency effect, and how it affects your printing, you may want to consider how you approach a printing session.
